Angular Unit Test With Samples And Best Practices

Today in this article we shall cover Angular Unit Test With Samples And Best Practices for application development.
Introduction
There are huge benefits of writing good Unit Tests as they help with regression, provide easy documentation, and facilitate the good design. Your application/service consists of a bunch of functionalities that are built together to perform business operations.
We shall cover below best practices and basics of Unit Testing in Angular,
- Where to start?
- Characteristics of Good Unit test cases
- Name your UI Unit Test
- Unit Test cases should run Fast
- Create an isolated Unit Test
- Test code developed by you
- Structure your Test
- Test Data for Unit test
- Unit Test for DOM elements
- Test only Public Functions/Methods
- Understanding TestBed in Angular
- Getting started
- Unit Testing Angular Component and Child Component
- Unit Testing an Angular Custom Service
- Summary
Tests are termed unit tests as it more talks about an individual piece of application which are tested in isolation. Each small individual API is important and represents a unit and hence needs to be tested in isolation.
A small/large bunch of functionality together makes your application complete in a sense. It’s important these small individual functionalities are robust enough to make sure your application performs best in a real production environment.
This article describes some best practices regarding unit test design for yours any Angular-based projects.
Where to start?
We understand the concept of Unit tests but there is always confusion on “Where to start”. Isn’t it?
I will keep the answer pretty simple here before moving on to other aspects of UI unit testing,
All public functions within a typescript class (created by you) require a unit test.
Once you do that, the next thing important is to unit testing for UI DOM elements for their naming and other properties which we shall see below,
Characteristics of Good Unit test cases
Good Coding practices and unit test cases always complement each other in a great way resulting in better and maintainable code.
Good coding practices and Better Unit Test cases make your code of Best quality.
Name your UI Unit Test
- The name your Unit Test method appropriately
- Your method name should describe the method being tested.
- Should describe the scenario under which it’s being tested.
- The expected behavior when the scenario is invoked.
Unit Test cases should run Fast
- It means to build your functions as small as possible mainly single responsibility function.
- Small functions are easier to test and maintain.
- Small functions promote reading and reuse
- Small functions help avoid hidden bugs
Create an isolated Unit Test
- Unit test cases are meant only for a given function and its business logic.
- It should be created and run removing any external dependencies leveraging mocking the dependencies
Test code developed by you
- Unit-test code that you are/have developed/developed.
- Do not test auto-generated code
- Do not test third-party code if you are not owning it
Structure your Test
- Structure your test with expected and actual results elements properly
- Structure your Test as per patterns like Given-When-Then or AAA(Arrange- Act- Assert)
Test Data for Unit test
- Prefer a helper method to set up test data for your test if needed.
- This shall help reusability and readability instead of setting up too much in each test set up.
Unit Test for DOM elements
- It’s preferred to write Unit tests for DOM (mainly Static) elements helping to identify the breaking changes in the early stage.
- Try mocking external components and their DOM elements.
Test only Public Functions/Methods
- Test the public method of your typescript classes
- Private method logic can be tested simply using the Public interface using it including all possible scenarios.
Understanding TestBed in Angular
In this article, our focus would be more on how to unit test UI elements and services. We will test Components, Child components, Services, Pipes, etc. This could be a huge benefit when working to assure that your components actually do what they’re supposed to do.
We’ll start by looking at TestBed, which is the main testing tool provided by Angular. We’ll look at how to test out templates and will check how to deal with components, child components, directives, services, and Pipes samples, etc.
We will be building on the code that we wrote for Isolated Unit Tests.
Getting started
- The component we’re going to start with is the HeroComponent.
- Create a new file hero.component.spec.ts.
- Let’s create our beforeEach function, and inside of here, we’re going to use a special utility called the TestBed.
- The TestBed is what allows us to test both the component and its template running together. And really what’s going to happen is we’re going to create a special module just for testing purposes.
- We do that again with the TestBed object, and I’m going to import that object from @angular/core/testing.
- The TestBed has several different methods, but the one that we need is the configureTestingModule. We are creating a module specifically for testing.
- Paste the below code in hero.component.spec.ts file:
import { HeroComponent } from "./hero.component";
import { ComponentFixture, TestBed } from "@angular/core/testing";
import { NO_ERRORS_SCHEMA } from "@angular/core";

describe('HeroComponent', () => {
   let fixture: ComponentFixture<herocomponent>;
   beforeEach(() => {
       TestBed.configureTestingModule({
           declarations: [HeroComponent],
           schemas: [NO_ERRORS_SCHEMA]
       });
       fixture = TestBed.createComponent(HeroComponent);
   });
})
- The create a component function, if you’ll look at the signature, actually returns a ComponentFixture. A ComponentFixture is basically a wrapper for a component that’s used in testing and it has a few other properties, more than just what the component itself has.
- Once we have the fixture we can access quite a few things about the component, one of them is the component instance itself.
With the above understanding of the components and their definition, we shall start writing a few additional Angular test cases.
Let’s write a couple of tests.
- Firstly, we’re just going to check that the HeroComponent has the correct hero.
- Paste the below code in hero.component.spec.ts file:
it('should have the correct hero', () => {
fixture.componentInstance.hero={ id: 1, name: 'SuperFunGuy', strength:7 };
expect(fixture.componentInstance.hero.name).toEqual('SuperFunGuy');
   })
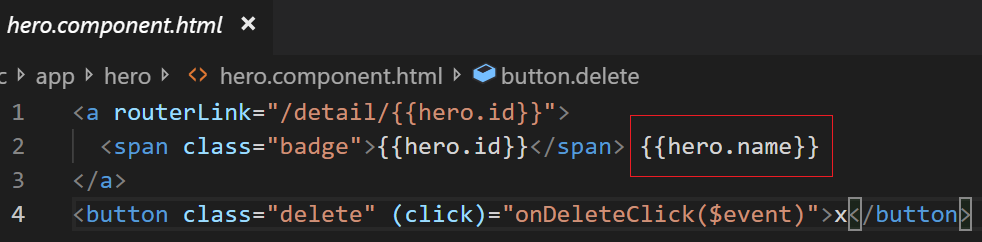
- In the second test, we will see if the HTML is rendered properly.
- We will render the hero name in the anchor tag.
- Paste the below code in hero.component.spec.ts file.
it('should render the hero name in an anchor tag', () =>{
fixture.componentInstance.hero={ id: 1, name: 'SuperFunGuy', strength:7 };
fixture.detectChanges();
expect(fixture.nativeElement.querySelector('a').textContent).toContain('SuperFunGuy');
 })
- We are calling fixture.detectChanges.
- This is another useful method on that fixture that’s a wrapper of our component and its template. This tells the component to run change detection and update any bindings that may exist on the component.
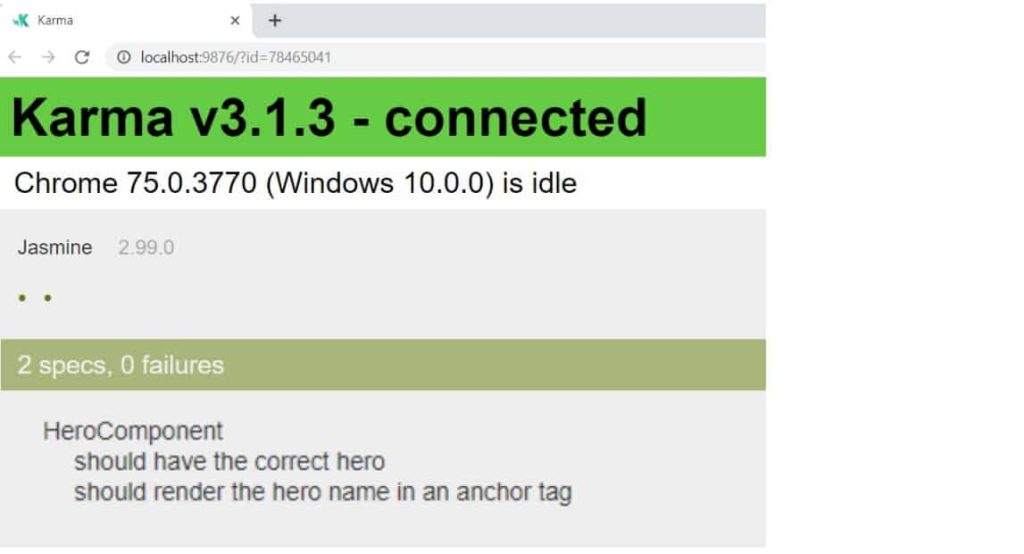
- Finally, run the test using ng test command in the terminal.
Unit Testing Angular Component and Child Component
It’s time to write our first test for a component. We’re going to test the HeroesComponent and associated Child component.
Please see here for a complete example,
Unit Testing an Angular Custom Service
Please refer to the below article to learn about Unit testing in Angular Pipe,
That’s All, Enjoy Coding!!
Sound Off your comments below if any.
Summary
In this article, we looked at Angular Unit testing concepts with examples, etc. We tried to understand below type of unit testing with sample codes,
- The TestBed concepts
- Unit Testing Components
- Unit Testing and Mocking an Injected Angular Services.
- Unit Testing and Mocking Child Components.
- Unit Testing and Mocking Lists of Elements.
- Unit Testing Pipes.
Please bookmark this page and share it with your friends. Please Subscribe to the blog to receive notifications on freshly published (2025) best practices and guidelines for software design and development.
