Data Binding in Angular 9 Forms

[Updated:02/20]
Introduction
In our last article on Getting Started With Angular, we learned basics like how to create and run an Angular 9 application. We went through details of the Angular Project structure too.
When working with a form, we need to keep track of all the data entered into the form, and we may need to populate that form initially with some object.
This object is called a model or a data model, and we use the technique of data binding to get this data into the form and back out of the form as the user modifies it or hits the save button.
This article in a nutshell,
- We’ll start off by seeing how Angular has a ngForm directive that it automatically adds to every form in the project.
- We’ll see how we can work with the ngModel directive. This is used on fields in the form, and it helps build up our model, the object used to hold our data.
- We’ll see how we can create a custom data model. This is usually something stored in permanent storage, either on the browser side or normally we get it from a data service over the web. And then once we have that object, to use it in the form, we use two-way data binding.
Today in this article, we will cover below aspects,
We will build on the code we wrote in the previous blog on,
Data B
inding Design
In our article on the Architecture and Design of Angular, we already touch base on data binding concepts.
We shall see more in depth on data binding in this article,
Getting Started
Using NgForm
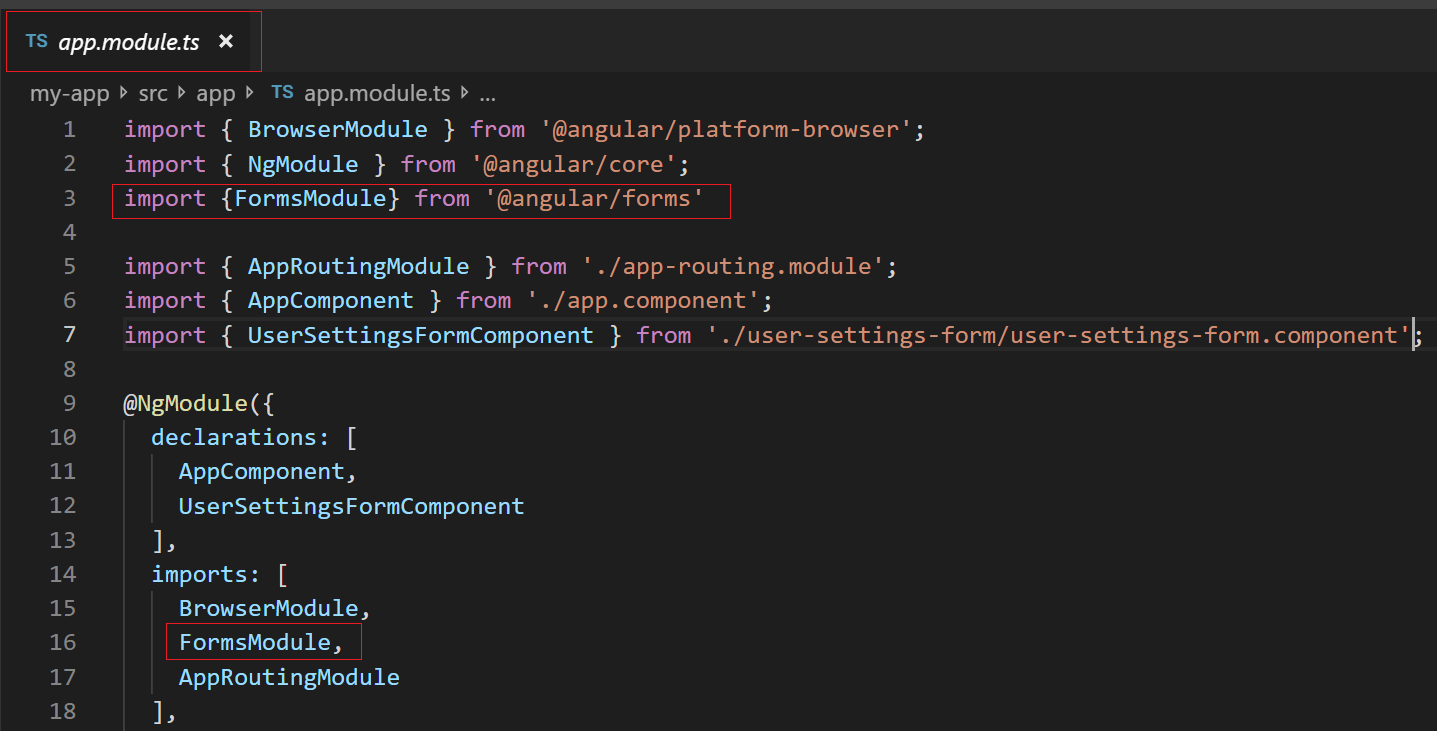
- Import forms module into your application by adding it to app.module.ts.
- We let Angular take over our forms by using a ngForm directive. This directive gives us valuable information about our forms.
- When Angular parses a template, it’ll look for the form tag and add this directive. Angular will see this directive and create an instance of ngForm.
- The first thing we need to do is create a template reference variable.
- We use the # symbol and a variable name. So #form is the variable, and we assign the string ngForm to the variable. Open user-settings-form.component.html and add the template reference variable.

- Even though that looks like a string here, we will get access to the ngForm object.
- To use this template reference variable, we can go ahead and place it in the markup.
- Add it after the Send button in the user-settings-form.component.html.
- We’ll use the double-curly braces for interpolation, and form here refers to the #form template reference variable.
- That is our ngForm, and we’re going to pipe that object through the JSON filter. That’ll just format it nicely for us so that we can see the properties and values accurately.
- I’ll save it, run the code using ng serve –open command and now we can see all the properties belonging to our ngForm instance.
- It starts off with submitted being false, and you can take a look at any property you’d like, but mostly we’re going to be looking at the value property.
- And even if we go into our form and enter some values, we can still see that value isn’t being updated, and the reason for this is that we need to let Angular know about each one of these fields in our form. We use the ngModel directive for that, and we’ll take a look at that next.
NgModel
- When building a form, the ngModel directive gets placed on every field that we want Angular to know about. ngModel helps us build up that values object that we saw in the last section.
- Let’s go to our template. We’ll simply add ngModel to all our controls.
- Angular is aware of ngModel when we imported the forms module from @angular/forms, so we don’t need to do anything else to set up this directive.
- Now another thing I want to do is go to where we’re printing out our form, and instead of showing the entire form, let’s just show form.value.
- The user-settings-form.component.html looks like below:
<div class="container">
 <h2>User Settings</h2>
<form #form="ngForm">
 <div class="form-group">
 <label for="name">Name</label>
 <input id="name" name="name" class="form-control" ngModel/>
</div>
<div class="form-check form-group">
   <input class="form-check-input" type="checkbox" value="" id="emailOffers" name="emailOffers" ngModel>
   <label class="form-check-label" for="emailOffers">
     Email Offers
   </label>
 </div>
  <p>User Interface Style</p>
 <div class="form-group">
 <div class="form-check">
     <input class="form-check-input" type="radio" name="interfaceStyle" id="lightInterface" value="light" ngModel>
     <label class="form-check-label" for="lightInterface">
       Light
     </label>
   </div>
   <div class="form-check">
       <input class="form-check-input" type="radio" name="interfaceStyle" id="mediumInterface" value="medium" ngModel>
       <label class="form-check-label" for="mediumInterface">
         Medium
       </label>
     </div>
     <div class="form-check">
         <input class="form-check-input" type="radio" name="interfaceStyle" id="darkInterface" value="Dark" ngModel>
         <label class="form-check-label" for="darkInterface">
           Dark
         </label>
       </div>
     </div>
       <div class="form-group">
           <label for="subscriptionType">Subscription Type</label>
           <select class="form-control" id="subscriptionType" name="subscriptionType" ngModel>
             <option>Monthly</option>
             <option>Annual</option>
             <option>Lifetime</option>
           </select>
         </div>
         <div class="form-group">
           <label for="notes">Notes</label>
           <textarea id="notes" name="notes" class="form-control" rows="5" ngModel></textarea>
         </div>
 <button class="btn btn-primary">Send</button>
</form>
- I’ll save this and we get the below output in the browser.
- Because we added ngModule to the fields, we get the property names with their respective value. And if you’re wondering where the property names come from, they come from the attribute name on the fields.
In the next section, we’ll take a look at working with a data model. That way we’ll keep track of an object in our TypeScript class that we can use to populate the form before the user even sees it. And then as the user changes the form, the object will get updated, and we’ll no longer need form.value.
Creating a Data Model
- In the last section, we saw how Angular would build an object for us as we filled out our form, but in many other cases, we’re already going to have an object that we want to use to populate the form, and then we’ll want that object to change as the form gets filled out or saved.
- Let’s take a look at how we can create a data model.
- Open up the src folder, and the app folder, and let’s create a new folder called data.
- We will create an interface that’ll tell us the shape of the model.
- We’ll name it user-settings.ts.
- Please find the code for user-settings.ts below:
export interface UserSettings {
   name: string;
   emailOffers: boolean;
   interfaceStyle: string;
   subscriptionType: string;
   notes: string;
}
- In our user-settings-form component.ts, we’ll create a variable called userSettings. And the type is userSettings, the interface we just created.
- And we’re going to need to import that.
- We need to take this model and use it to populate the form, then as the form changes, we want to make sure that this model gets updated. So we’ll use two-way data binding for that.
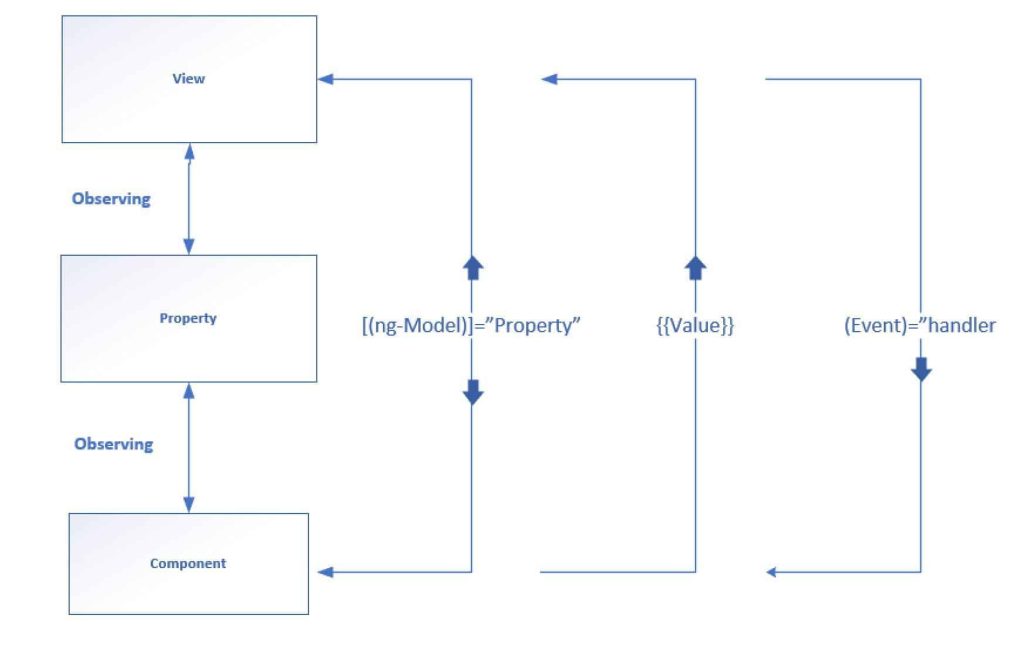
Two Way Data Binding
- So we have a model all set up with our data, now we want to establish two-way data binding between that model and the form.
- We establish two-way data binding by using the banana in a box syntax.
- We surround ngModel with parentheses, and then we surround all of that with the square brackets, and that establishes two-way data binding, as shown below:
- Bind all the fields in userSettings with the respective values we defined in user-settings-form.component.ts.
- The user-settings-form.component.html looks like this:
<div class="container">
 <h2>User Settings</h2>
<form #form="ngForm">
 <div class="form-group">
 <label for="name">Name</label>
 <input id="name" name="name" class="form-control" [(ngModel)]="userSettings.name"/>
</div>
<div class="form-check form-group">
   <input class="form-check-input" type="checkbox" value="" id="emailOffers" name="emailOffers" [(ngModel)]="userSettings.emailOffers">
   <label class="form-check-label" for="emailOffers">
     Email Offers
   </label>
 </div>
  <p>User Interface Style</p>
 <div class="form-group">
 <div class="form-check">
     <input class="form-check-input" type="radio" name="interfaceStyle" id="lightInterface" value="light" [(ngModel)]="userSettings.interfaceStyle">
     <label class="form-check-label" for="lightInterface">
       Light
     </label>
   </div>
   <div class="form-check">
       <input class="form-check-input" type="radio" name="interfaceStyle" id="mediumInterface" value="medium" [(ngModel)]="userSettings.interfaceStyle">
       <label class="form-check-label" for="mediumInterface">
         Medium
       </label>
     </div>
     <div class="form-check">
         <input class="form-check-input" type="radio" name="interfaceStyle" id="darkInterface" value="Dark" [(ngModel)]="userSettings.interfaceStyle">
         <label class="form-check-label" for="darkInterface">
           Dark
         </label>
       </div>
     </div>
       <div class="form-group">
           <label for="subscriptionType">Subscription Type</label>
           <select class="form-control" id="subscriptionType" name="subscriptionType" [(ngModel)]="userSettings.subscriptionType">
             <option>Monthly</option>
             <option>Annual</option>
             <option>Lifetime</option>
           </select>
         </div>
         <div class="form-group">
           <label for="notes">Notes</label>
           <textarea id="notes" name="notes" class="form-control" rows="5" [(ngModel)]="userSettings.notes"></textarea>
         </div>
 <button class="btn btn-primary">Send</button>
</form>
</div>
<h3>{{userSettings | json}}</h3>
- When this form is shown, the controls will get their respective value from userSettings. And as the user changes the value of any field, it’ll get placed back into userSettings, and one way we can prove this is by looking at userSettings. So instead of looking at form.value, we’ll take a look at userSettings. I’ll save this, and I’ll pull up the browser.
Other references :
Source Code Available on GitHub
git clone https://github.com/thecodebuzz/angular-8-forms-2way-binding
Summary
In this article, we learned on data binding concept and we covered below aspects of data binding in Angular,
- ngForm
- ngModel
- Data Model and understood how it works.
- Two-way Data Binding in Angular
We shall continue our learning and in the next article, we will learn the basics of Data validation/form validation. Stay tuned !!
Please bookmark this page and share it with your friends. Please Subscribe to the blog to receive notifications on freshly published (2025) best practices and guidelines for software design and development.