NSwag Basic Authentication OpenAPI Swagger in ASP.NET Core
In this article, we shall see how to enable Basic Authentication for OpenAPI documentation in the ASP.NET Core API .
Today in this article, we will cover below aspects,
OpenAPI describes the standards and specifications for the RESTFul API description. These specifications are an attempt to create a universal and language agnostic description for describing the REST API.
Benefits of Open API specification
The open specification provides the advantage of understanding the RESTFul services easily (especially if developers are consuming any new API ) plus
-Helps provide easy ready documentation saving time
-It provides details of the capabilities the service owns.
-Serve the Swagger UI to browse and test the web API.
-Client-side SDK generation
-Helps in API discovery.
In our last article on NSwag Swagger API documentation in ASP.NET Core we learned about the basics of adding documentation in ASP.NET Core API using NSwag.
In this post, we will see how to enable Basic Authentication in Swagger/OpenAPI documentation in ASP.NET Core API using NSwag tooling.
We shall continue from our previous article and extend it to Basic Authentication.
We already had added below Nuget packages to the project,
Add NSwag Nuget package
PM> Install-Package NSwag.AspNetCore -Version 13.7.0
OR
Install it through Nuget Package Manager,

Above NSwag.AspNetCore NuGet package adds the services required for OpenAPI 3.0 generation and exposes various extension method like,
- AddOpenApiDocument
- AddSwagger
- AddSwaggerDocument
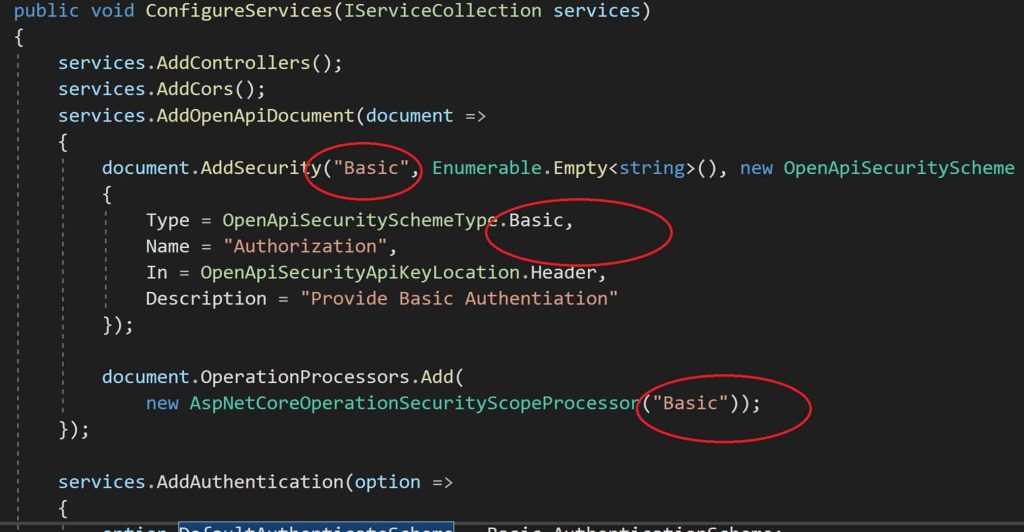
Update ConfigureServices() method
Here below please define the ApiSecuritySchemeType as Basic with auth key credentials location in the header.
OpenApiSecuritySchemeType enum lets you define security scheme type of your choice like Basic, Apikey, Oauth2 or OpenIdConnect etc.
document.AddSecurity("Basic", Enumerable.Empty<string>(), new OpenApiSecurityScheme
                {
                    Type = OpenApiSecuritySchemeType.Basic,
                    Name = "Authorization",
                    In = OpenApiSecurityApiKeyLocation.Header,
                    Description = "Provide Basic Authentiation"
                });
Add Swagger UI in API pipeline
Please add below the Application builder extension to add the Swagger UI interface in the API pipeline.
Please update the Configure() method for the below,
            app.UseOpenApi();

            app.UseSwaggerUi3();
UseOpenAPI() extension can also be used to add more metadata about the API like Title or Description, License details etc.

Basic Authorization button on Swagger UI
Once you run API, Authorize button will be visible in swagger UI.
Please provide Basic Auth credentials- username and password value and click on Authorize.
Sample Basic Authentication Base64 string representing your credentials will be passed through Header as below as below,
“Authorization: Basic ZGZzZGY6c2Rmcw==”
That’s all, you are all set to use NSwag with a Basic Authentication schema enabled.
This Authentication will be used for all API in the service as it’s global in nature.
Success(200) response
For valid Basic Authentication credentials you shall receive 200 HttpResponse
UnAuthorized(401) reponse
For invalid Basic Authentication credentials, you shall receive 401 UnAuthorized response,
Thats All !! Happy Coding!!
If interested for basic NSwag OpenAPI Swagger Documentation, please visit the below article,
Summary
In this post, we learned how to add OpenAPI documentation using NSwag tooling for a secured API using the Basic Authentication scheme. OpenAPI describes the standards and specifications for RESTFul API descriptions and NSwag tooling helps us enabling the same in simple easy steps.
Please bookmark this page and share it with your friends. Please Subscribe to the blog to receive notifications on freshly published (2025) best practices and guidelines for software design and development.