React Components Lifecycle with State and Props – Best Practices

Today in this article we shall learn React Components Lifecycle with State and Props and we shall see easy-to-follow Best Practices.
Before we jump on to the main topics, I shall talk about the Class-based component, its usage, and its benefits.
- Getting started
- Thing to consider while creating a class-based Component,
- State in React Component
- Lifecycle methods in React Component
- Constructor
- Render
- componentDidmount
- componentDidUpdate
- componentWillunMount
- Best Practices for State in React components
- Do not modify the State object directly
- Always use SetState to modify the State object
- Asynchronous State update by React
- Each State object is managed independently
- State objects data is owned by the Component only
- Understanding Props Systems and Component Communication
- Summary
In React Programming creating class-based components provides a lot of benefits and it is a preferred way of creating and initializing the components.
A few benefits of using class base components are listed below,
- Easy code Maintainance
- Easy to handle input and events
- Easy life cycle event management
- Easy data initialization
- Allows to use of ‘State’ (usable in Class-based component)
- Easy way to manage asynchronous API
Class-Based Components should be created using Javascript classes. Javascript classes were introduced in 2015 following ECMA standards
Getting started
As we saw in our last article Getting started with React, we used a function-based component where we rendered the UI with ‘Hello World’.
Here is an example of a function based Component,
import React from 'react';
import logo from './logo.svg';
import './App.css';

function App() {
  return (
    <div className="App">
      <header className="App-header">
        <img src={logo} className="App-logo" alt="logo" />
        <p>
          Hello, World!
        </p>
      </header>
    </div>
  );
}

export default App;
Thing to consider while creating a class-based Component,
- The class should be extended from React.Component class
- Every class created should define a render method that returns JSX. One can use a constructor or super method additionally to initialize the data.
We shall now use Class based component and simply replace that as below,
class App extends React.Component {
  render() {
    return (
      <div className="App">
        <header className="App-header">
          <img src={logo} className="App-logo" alt="logo" />
          <p>
            Hello, World!
        </p>
        </header>
      </div>
    );
  }
}
The above code can easily be migrated to the class-based component as below,
class App extends React.Component {
  render() {
    return (
      <div className="App">
        <header className="App-header">
          <img src={logo} className="App-logo" alt="logo" />
          <p>
            Hello, World!
        </p>
        </header>
      </div>
    );
  }
}
Below are high-level changes from Function-based to Class-based Component
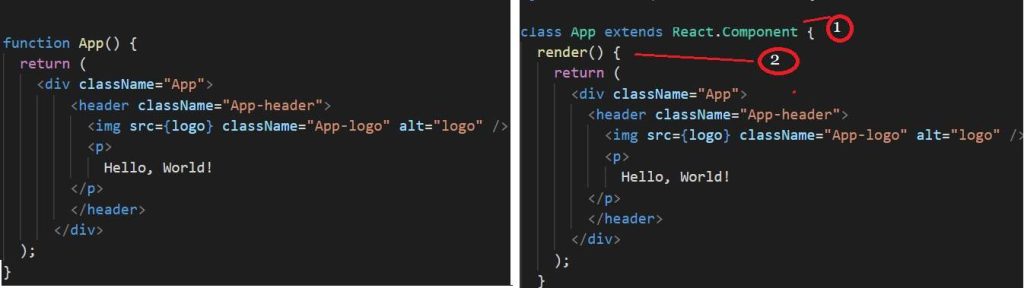
So overall, we have followed the below steps to create a class-based component,
- Create an ES6 class App, extending React.Component.
- We must add the render() method as reacting expects it.
- We moved the body of the function into the render() method.
State in React Component
Let’s start using the state in our React component.
Using State with function-based React component is tricky. However, The State works very nicely with a class-based React component.
What is State:
State is a Javascript object which can hold the data for the given Component.
We shall initialize the state in the React component as below.
The state can be declared using the below conventions.

This assignment to state can only be done in the Constructor i.e just once when components get created
You must never assign a State object directly. You must use the SetState() function to assign or update the State object anytime.
Lifecycle methods in React Component
Let’s now understand the overall life cycle methods that get invoked in the React component.
We shall be updating the above code for state objects and trying to understand the life cycle methods,
class App extends React.Component {

  constructor(props){
    super(props)
    this.state = { date:new Date()}
 }
  render() {
    return (
      <div className="App">
        <header className="App-header">
          <img src={logo} className="App-logo" alt="logo" />
          <p>
            Hello, World!  Current Time : { this.state.date.toLocaleDateString() }
        </p>
        </header>
      </div>
    );
  }
}
In the above code below is the sequence of methods that get called,

If you have any useful Life Cycle methods like componentDidmount or componentDidUpdate or componentWillunMount then such methods will get executed too right after render and just before UI is displayed.
As shown above in the diagram, please see a brief description of each stage
Constructor
Constructors get called first when the Component life cycle starts.
It is the best place to initialize the data.
Render
Right after the Constructor Render method gets called.
Its sole responsibility is to return JSX only.
Please note that Render should not do anything apart from rendering the JSX. Please do not write any business logic or fetch any details or update state in Render method
componentDidmount
componentDidmount method gets called once for the given components. componentDidmount method is a good location to do initial data loading.
It’s recommended to use componentDidmount for initial data loading. You may use it to call Example: Fetch GET methods or for calling a custom function with business logic.
componentDidUpdate
componentDidUpdate is a good location to do data loading when a data update happens on the component. Please make sure to use conditional updates to the selected resources (to avoid any recursive calls).
componentWillunMount
Use componentWillunMount for performing clean-up activities.
If using any external libraries like vendor components etc. in your application, it’s your responsibility to unload/unmount it after its usage.
Best Practices for State in React components
Lets now learn a few Best Practices for the state in React components.
Do not modify the State object directly
The example below state object date is modified using the direct assignment as below which is wrong.
Always use SetState to modify the State object
You must use setState to modify, update modify the State objects.
In the example below date, State object is modified to use a new Date object using setState function.
Asynchronous State update by React
Considering performance React may update multiple setState calls into a single update.
Do not directly rely on this state object as the code may fail to get the latest state objects when accessed asynchronously.
Instead, use setState() accepting a function as shown below rather than using actual objects.
Each State object is managed independently
Each State object is independent of the other but when called with the setState React merges those objects to the current state.
In the below example State objects like date, amount, and accounts can be independently updated and retrieved as required.
State objects data is owned by the Component only
State objects are owned by a component only and can never be treated as State objects outside of that component. However one can send State objects to other child components as props. Such data flow if needed can should be uni-directional i.e should always flow from the origin to its child component.
Understanding Props Systems and Component Communication
Please refer below article for more details on the Props system,
Other references:
Summary
In React Programming class-based components provide a lot of benefits and it is a preferred way of creating and initializing the components. Today in this article we learned how to create a class-based component and then we understood how to leverage State and Props in React components and also learned a few best practices for managing them in the application.
Please bookmark this page and share it with your friends. Please Subscribe to the blog to receive notifications on freshly published (2025) best practices and guidelines for software design and development.