Azure EventHubs – Send and Receive Events using C# .NET – Part I
Today in this article, we will see Azure EventHubs – Send and Receive Events using C# .NET.
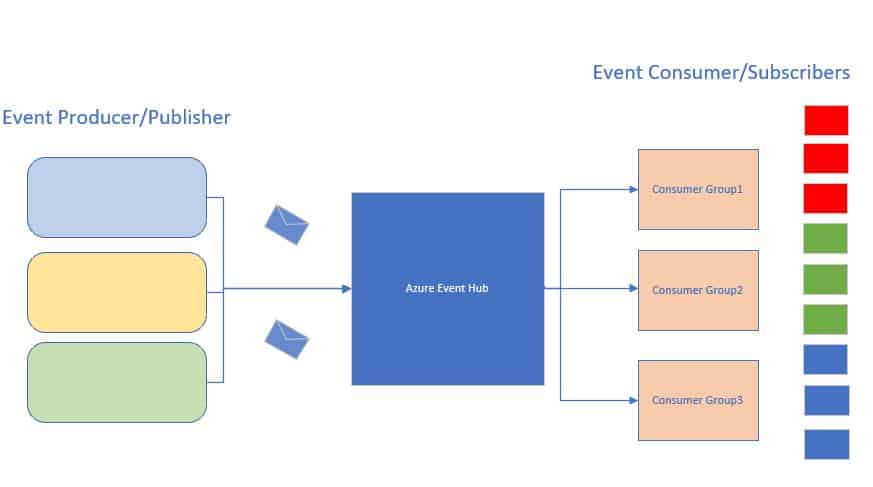
We will cover how to create producer and consumer applications for sending and receiving the events from Azure Events Hubs using the C# .NET application.
In this article first, we will focus on the Producer example.
If interested to know about consumer examples, please visit the below article,
What is Event Hub and why to use it?
Azure Event Hubs is a streaming platform and event ingestion service in the Azure Cloud environment.
Event Hub provides a platform for seamless integration of data and various services within and outside of the Azure Cloud environment.
The Azure Event Hub Producer writes data to Microsoft Azure Event Hub. It also lets you select different destinations as needed.
Example– If using Data Lake Storage, use the Azure Data Lake Storage as a destination.
To write to Microsoft Azure IoT Hub, use the Azure IoT Hub as a Producer destination.
Main characteristics,
- Azure Event Hubs is a streaming platform and provides a distributed stream processing platform with data and analytics.
- Provides the ability to process millions of events per second.
- Ability to transform the data using a different provider or adapter of your choice
- Event Hubs provide a time retention policy buffer.
- It helps to decouple event producers from event consumers.
- Support for real-time and batch processing.
Prerequisites
- Please create an Azure Storage account
- Please create Blob Container
Getting started
Assuming you already have an Azure subscription with an Azure storage account and a blob container.
Let’s start creating the .NET Core console application as below,

Add NuGet package called Azure.Messaging.EventHubs
Using Package Manager Console,
PM> Install-Package Azure.Messaging.EventHubs
Or
Using NuGet Package Manager

I shall be loading the configuration as below,
var builder = new ConfigurationBuilder()
                     .SetBasePath(Directory.GetCurrentDirectory())
                     .AddJsonFile("appsettings.json", optional: true, reloadOnChange: true)
                     .AddJsonFile($"appsettings.{Environment.GetEnvironmentVariable("ASPNETCORE_ENVIRONMENT")}.json", optional: true);
            var configuration = builder.Build();
Below is my configuration file with details on the Event Hun Namespace Connection string and Event Name, etc.
{
  "HubNameSpaceConString": "Endpoint=sb://<Your Connection String >.servicebus.windows.net/;SharedAccessKeyName=RootManageSharedAccessKey;SharedAccessKey=<Your Key>",
  "EventHubName": "firstevent"
}
Azure EventHub Producer C# Example
When you configure the Azure Event Hub Producer, you need to specify the Microsoft Azure Hub namespace and Event hub names.
You also need a connection string key and define the shared access policy name if any.
Below is the complete code base,

In the above code,
- We are using the EventHubProducerClient to create a Producer class object.
- We are passing the connection string to use for connecting to the Event Hubs namespace.
- We are creating EventDataBatch objects to create batching support. Here our batching is currently supporting Ex. 10 message/batch.
- SendAsync() method lets send the data as a batch to EventHub.
The above code will publish the data to Event Hub successfully.
Similarly below shows full Metrics with details on Messages and Throughput (in Bytes of data) loaded to Event Hub,
Do you have any comments or ideas or any better suggestions to share?
Please sound off your comments below.
Happy Coding !!
References:
- Consumer Example – Send and Receive Events from Azure Event Hubs in .NET – Part II
Summary
Today in this article, we learned, how to configure Event Hubs using .NET. We created a Producer and Consumer application for the Azure Event Hub. We understood how Event Hub provides a distributed stream processing of data and analytics services and helps you process millions of records with low latency and easy integration.
Please bookmark this page and share it with your friends. Please Subscribe to the blog to receive notifications on freshly published (2025) best practices and guidelines for software design and development.