Angular – Pass Data From Parent to Child and Child to Parent Component – Part II
Today in this article we shall learn how to perform component interactions where we shall perform Angular – Pass Data From Child to Parent Component.
In our last article on Passing Data From Parent to Child Component, we already learned how to pass data using the @Input decorator from a Parent Component to a Child Component easily.
- The example is the continuation of the example we discussed in the article Passing Data From Parent to Child Component.
We shall cover below basic aspects below in today’s article,
- Getting Started
- What is the @Output Decorator system in Angular?
- Naming Pattern
- Create Component – ChildComponent
- Create Component – ParentComponent
- What is Redux and use cases around its usage
- I shall be covering Redux usage and when to use it and when not in my next article! Until then please stay tuned!
- Other references
- Summary
Before we get started, I am assuming you already have a basic understanding of Angular Architecture and its design.
If not, kindly go through a series of articles on Angular,
Getting Started
Let’s get started step by step to perform data transfer from the Child to the Parent component.
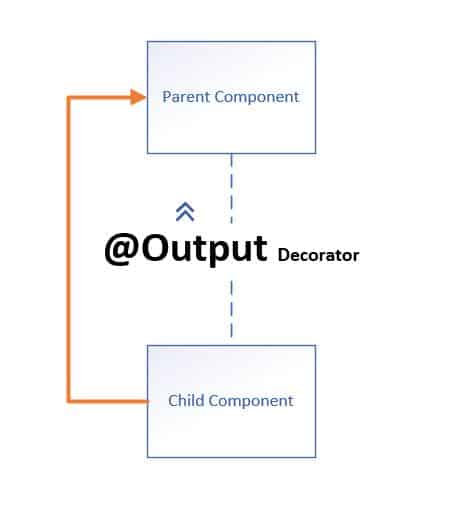
What is the @Output Decorator system in Angular?
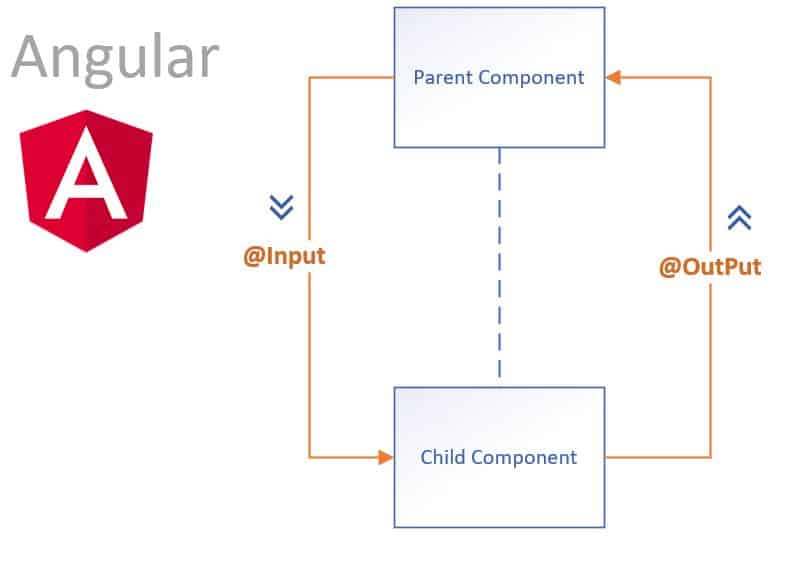
@Output decorator in Angular is a mechanism of passing the data from Child components to Parent components. Using @Output decorator data flow upstream.
So initially in the below example, we shall be focussing on how we provide information from the Child to the Parent in the Angular component, and then we shall see how to consume data in the Parent components.
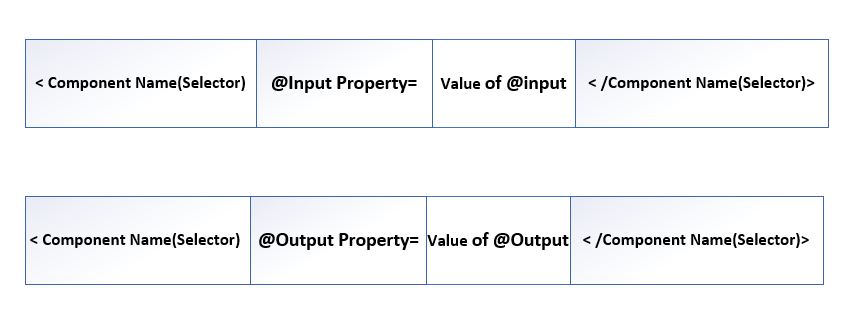
Naming Pattern
Below is the Naming Pattern for the @Input and @Output decorators with Components,
Let’s see a few examples,
Example:
@Input property
<app-child [movie]= "movieSelected"></app-child>
<app-user-info [user]= “userDetails”></app-user-info>
@Output with event emitter property
<app-child
      [movie]="movieSelected"
      (notifyTicketBook)="onNotifyTicketBook($event)">
 </app-child>
I shall be using very basic two components defined as below
- Parent Component name as – ParentComponent
- Child Component name as – ChildComponent
Create Component – ChildComponent
Similarly, Let’s create a simple Child Component – ChildComponent as below,
child.component.ts file as below,
@Component({
  selector: 'app-child',
  templateUrl: './child.component.html',
})

export class ChildComponent {
  _name: string;
  @Output() notifyTicketBook = new EventEmitter<string>();
  @Input('movie')
  set name(name: string) {
    this._name = name || '<Movie not found>'
    console.log(name)
  }
  get name(): string { return this._name; }
}
child.component.html file as below,

Above in the Child Component – ChildComponent we performed the following,
- The child component exposes EventEmitter property i.e notifyTicketBook
- This property is decorated with @Output decorator notifyTicketBook
- It emits the event when something happens.
- This event emitter emits a string object which is a selected movie.
- The parent binds to this event property and reacts to events.
Once you launch the app, you shall see both the components executes and produces the below result on the UI,
Create Component – ParentComponent
Let’s create a simple Parent Component name called as – UserComponent as below,
parent.component.ts file as below,
@Component({
  selector: 'app-parent',
  templateUrl: './parent.component.html',
  styleUrls: ['./parent.component.css']
})
export class ParentComponent {

  movieSelected: string = '';
  movieBooked: string = '';

  AddMovie(movieId: string): void {
    if (!movieId) { return; }
    this.movieSelected = movieId;
    console.log(movieId)
  }

  onNotifyTicketBook(showBooked: string) {
    if (showBooked) {
      this.movieBooked= showBooked + ' Movie is booked successfully'
    }
  }
}
parent.component.html file for the component is defined as below,
<div>
  <div>
    <label>Search Movie:
      <input #movieName />
    </label>
    <button (click)="AddMovie(movieName.value); movieName.value=''">
      Select Movie
    </button>
    <app-child [movie]="movieSelected" (notifyTicketBook)="onNotifyTicketBook($event)">
    </app-child>
    <h4>{{movieBooked}}</h4>
  </div>
</div>
Above we are also using the Child Component within Parent using a naming pattern as we discussed in our last article on @Input system and plus we have @Output decorator defined as well.
Once executed, the app shall below result on the UI,
The workflow is as below,
- Users enter a movie in Search Movie Ex. Animators
- Child component receives it using @Input decorator property
- User select the books the Show
- Child Component emit the event to Parent for the given Movie name
- The parent receives the Event and prints the movie name received.
That’s All!
What is Redux and use cases around its usage
Once we go beyond and master component communication, you might need to think of proper state management in your application (especially if dealing with large enterprise applications).
I shall be covering Redux usage and when to use it and when not in my next article! Until then please stay tuned!
Other references
- Angular – Passing Data From Parent to Child Component.
Do you have any comments or ideas or any better suggestions to share?
Please sound off your comments below.
Happy Coding !!
Summary
Today in this article we understood further Component communication where we performed Child to Parent communication in Angular programming. We understood the @input and @OutPut decorator systems and understood their naming pattern and performed component communication in both directions.
Please bookmark this page and share it with your friends. Please Subscribe to the blog to receive notifications on freshly published (2025) best practices and guidelines for software design and development.