Angular – Pass Data From Parent to Child and Child to Parent Component
Today in this article we shall learn how to perform component interactions in Angular Applications.
You shall often find the need to Pass Data From One Component to another Component including Angular – Pass Data From Parent to Child and Child to Parent Component.
We shall cover below basic aspects in today’s article,
Before we get started I am assuming you already have a basic understanding of Angular applications.
If not, kindly go through a series of articles on Angular programming,
Getting Started
Let’s get started step by step from basics to advanced topics.
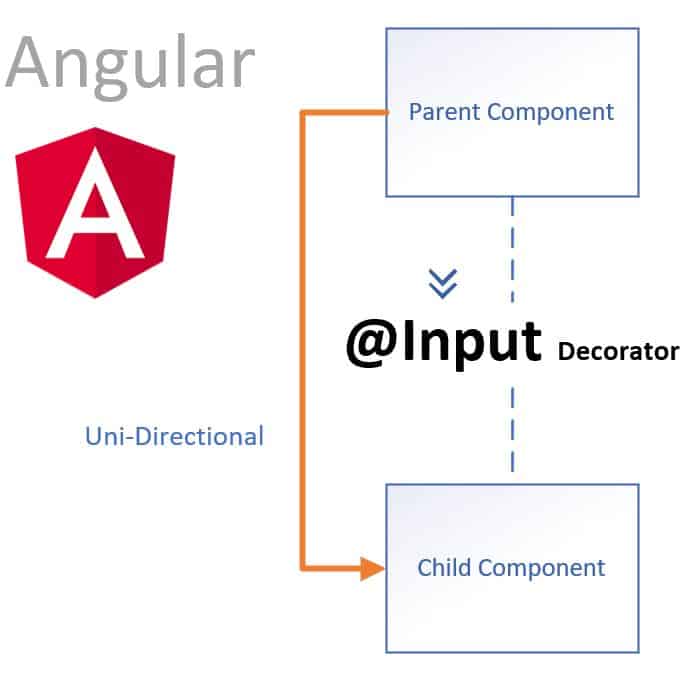
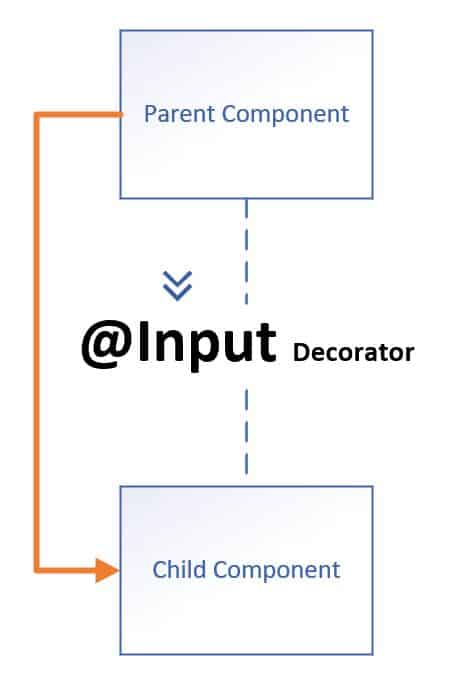
What is @Input System
@Input decorator in Angular is a mechanism of passing the data from Parent components to Child components.
Using @Input decorator data must flow uni-directionally.
Using Using @Input decorator data must flow uni-directionally i.e Parent to Child only
This data transfer happens in two stages. In the first stage, we provide information that is required from the Parent to Child components.
So let’s first focus on how we provide information from the parent to the child and then in the second stage we will see how the Child Component consumes or makes use of that information.
It’s important to take note that these Inputs systems work fine when you are working on lightweight applications and have few components to deal with the communication. But as the components grow in size and you need the same or similar data across the components hierarchy then you can take a different approach to manage the data like Redux as State management etc.
So let’s create two simple components. I shall be using very basic two components defined as below
- Parent Component – ParentComponent
- Child Component – ChildComponent
Create Parent Component
Let’s create a simple Parent Component – ParentComponent as below,
You can use commands - ng generate component command or you can add the required templates manually.
Below I have used the above commands to create the ParentComponent.
I have removed intentionally ngOnInit() and constructor implementation to keep the example below simple and easy to understand.
parent.component.ts file as below,
@Component({
  selector: 'app-parent',
  templateUrl: './parent.component.html',
  styleUrls: ['./parent.component.css']
})
export class ParentComponent {
  movieSelected:string= '';
  AddMovie(movieId: string): void {
    if (!movieId) { return; }
    this.movieSelected = movieId;
    console.log(movieId)
  }
}
HTML file for the component is defined as below,
<div className="ui segment">
      <div>
        <label>Search Movie:
          <input #movieName />
        </label>
        <button (click)="AddMovie(movieName.value); movieName.value=''">
          Select Movie
        </button>
      </div>
</div>
Below is the Parent Component look like,

In the above UI,
- Input text box user enter the movie name
- After putting its name, the User click on Select Movie
- We shall let the Child component read the input in the next step,
Create Child Component
Similarly, let’s create a simple Child Component – ChildComponent as below,
@Component({
  selector: 'app-child',
  template: `
  <div>
    Movie selected by User: "{{name}}"
  </div>
  `
})
export class ChildComponent {
  _name: string;
  @Input('movie')
  set name(name: string) {
    this._name = name || '<Movie not found>';
    console.log(name)
  }
  get name(): string { return this._name; }
}
Above ChildComponent does below,
- Defines named @Input i.e ‘movie’
- Once Parent send the Input value , it performs Set and Get on the value
- Print the value of movie.
So far so good !!
Let’s now define the relationship which Parent to Child relationship between the above two defined components.
Before defining the relationship lets see the Naming pattern for declaring a ChildComponent in the Angular Parent Component
Naming Pattern for @Input decorator with Component
Below shows the Naming Pattern for @Input decorator with Component,
Naming Pattern

Lets’ see a few examples,
Example:
<app-child [movie]= "movieSelected"></app-child>
<app-user-info [user]= "userDetails"></app-user-info>
Parent to Child Component using @Input
Let’s update the above-discussed component for Parent to Child communication.
Our goal here would be to transfer data from Parent Component ParentComponent to Child component i.e ChildComponent
Update code for Parent now contains the ChildComponent as below,
<div className="ui segment">
      <div>
        <label>Search Movie:
          <input #movieName />
        </label>
        <button (click)="AddMovie(movieName.value); movieName.value=''">
          Select Movie
        </button>
        <app-child [movie]= "movieSelected"></app-child>
      </div>
</div>
So what we did above was below,
- Above we have defined our @Input property name as movie
- Value of the property is defined as value of movieSelected
ParentComponent should be able to pass the movie object which has a value of “movieSelected” defined using the expression [movie]= “movieSelected”
Similarly, we shall be retrieving the same @Input propertyi.e movie in the Child component as below,
@Component({
  selector: 'app-child',
  template: `
  <div>
    Movie selected by User: "{{name}}"
  </div>
  `
})
export class ChildComponent {
  _name: string;
  @Input('movie')
  set name(name: string) {
    this._name = name || '<Movie not found>';
    console.log(name)
  }
  get name(): string { return this._name; }
}
Once executed, app shall below result on the UI,
That’s All!
I have covered Child to Parent communication Architecture and its usage in the below article!
Do you have any comments or ideas or any better suggestions to share?
Please sound off your comments below.
Happy Coding !!
Summary
Today in this article we understood how Component interacts in Angular programming. We understood the @Input Decorator in detail and understood the naming pattern and used it for passing the data from the Parent to Child Angular component.
Please bookmark this page and share it with your friends. Please Subscribe to the blog to receive notifications on freshly published (2025) best practices and guidelines for software design and development.