Connect .NET SQL Database – C# Example

There are multiple techniques to connect a .NET SQL Database. We will see the easiest and preferred techniques to connect .NET SQL Database C# examples using ADO.NET and Entity Framework (ORM) etc.
Today we will learn simple techniques of connecting SQL servers and performing basic CRUD operations like Read, Create, Delete, Update, etc.
If you would like to learn EFCore(ORM) or Dapper(Micro-Orm) usage which are the most preferred techniques for dealing with database operations please visit the below article,
Getting started – .NET SQL Database C#
Create any .NET or .NET Core application. To keep it simple I shall be using the Console application however you can use any project template.

Please install System.Data.SqlClient Nuget package
PM> Install-Package System.Data.SqlClient -Version 4.8.2
Also please add the below to your module,
using System.Data.SqlClient;
System.Data.SqlClient is the ADO.NET provider for accessing SQL Server or Azure SQL Databases. The .NET Framework Data Provider System.Data.SqlClient uses its protocol to communicate with SQL Server.
The .NET Framework Data Providers like ADO.NET Providers have components that can be used for data manipulation and fast, forward-only, read-only access to data.
With the above basic understanding of a few major components let’s start writing the Connection logic. and then fill our DataTable and DataSet objects with actual SQL Data.
using (SqlConnection _con = new SqlConnection(connectionString))
            {
                string queryStatement = "SELECT * FROM dbo.employee ORDER BY employeeID";

                using (SqlCommand _cmd = new SqlCommand(queryStatement, _con))
                {
                    employeeTable = new DataTable("Employees");

                    SqlDataAdapter _dap = new SqlDataAdapter(_cmd);

                    _con.Open();
                    _dap.Fill(employeeTable);
                    _con.Close();
                }
            }
In the above example,
SqlConnection– Represents a connection to a SQL Server database.
SqlCommand – Represents a Transact-SQL statement or stored procedure to be executed against a SQL Server database.
SqlDataAdapter –
Represents a set of data commands and a database connection that is used to fill the DataSet or DataTable and or update a SQL Server database.
- SelectCommand– In the above example, we have used Select commands which represent the SelectCommand property of the DataAdapter that retrieves data from the data source.
- InsertCommand – Inserts new data to the data source.
- UpdateCommand– Update existing data in the data source.
- DeleteCommand – Delete data from the data source.
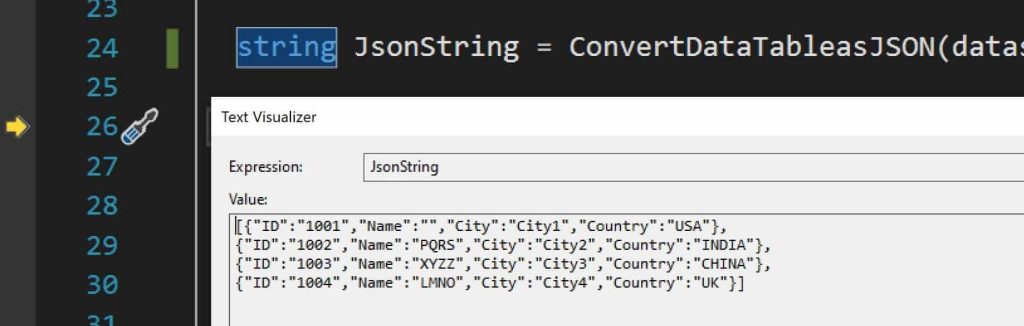
I am able to fetch the data successfully from SQL Database as below,
private string ConvertDataTableasJSON(DataTable dataTable)
        {
            return JsonConvert.SerializeObject(dataTable);
        }
I am loading the Connection string from apsettings.json using the ConfigurationBuilder technique mentioned in the article,
UpdateCommand – Update SQL Database Record
With the above basic understanding of SqlDataAdapter commands, let now perform a simple Update where we will update the first record in the SQL Database.
Here is the SQL Table where we have Employee details,

Let’s perform the Update using below code base,
In the above code, we are performing the below actions for the update,
- @1 – Open a SQL connection.
- @2 – Register SQL a set of data commands using SQLAdapter and SQLCommand object
- @3 – Execute generic Update command( Update commands can be used for UPDATE, DELETE or SELECT (Read) depending on the command registration in step2.
Once after executing the above command, we can see data got updated in the first row,
DeleteCommand- Delete SQL DataBase Record
You can very much be able to perform delete operations using similar steps explained above.
That’s All. Happy Coding!
Other useful references,
Do you have any comments or ideas or any better suggestions to share?
Please sound off your comments below.
Happy Coding !!
Please bookmark this page and share it with your friends. Please Subscribe to the blog to receive notifications on freshly published (2025) best practices and guidelines for software design and development.