How to Enable CORS in ASP.NET Core

In this article, we shall see how to enable CORS in ASP.NET Core API in a few simple easy steps. We already covered a few basics of CORS (Cross-origin resource sharing) in our last article.
We shall cover the below aspects in today’s article,
Getting started
What is CORS
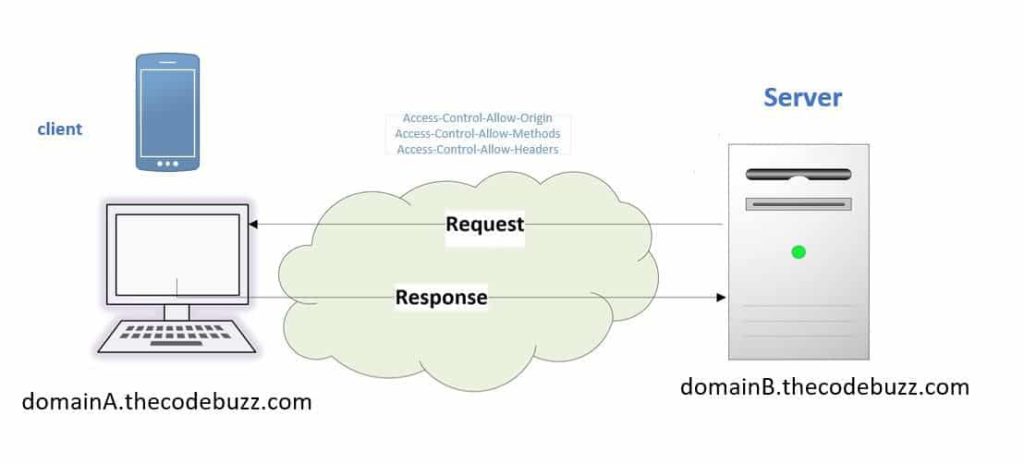
CORS (Cross-origin resource sharing) is a security feature that limits how web pages can communicate with resources from other domains.
- Web browsers are required to use CORS by design.
- Implementing the same-origin policy, which prohibits web pages from making requests to domains other than their own, prevents unwanted access to resources.
- Users are shielded from potential security threats like cross-site request forgery (CSRF) and cross-site scripting (XSS) attacks while enabling safe communication between various origins.
- Better Controlled cross-origin requests are made possible by CORS, which enables servers to specify which origins (domains) are permitted access to their resources.
For example, Applications origin could be different due to differences in the below,
- Domain,
- Protocol
- Port
With the CORS policy cross-origin requests and data transfers between browsers and servers can be secured.
If the Client (Thin) needs to communicate CORS is the only way where a server will allow to run Cross-Origin requests.
Let’s see a simple ASP.NET Core example
Create a sample service from the template of your choice. Here in this sample, I have used the .NET Core 3.1 project template.
If CORS is not enabled on the service side then, you shall get below similar familiar error while invoking API from different domains like any UI (Angular) or ASP.NET Web Application.
Access to fetch at ‘http://localhost:57827/api/test’ from origin ‘http://localhost:57838’ has been blocked by CORS policy: No ‘Access-Control-Allow-Origin’ header is present on the requested resource. If an opaque response serves your needs, set the request’s mode to ‘no-cors’ to fetch the resource with CORS disabled.
Below are the basic steps to enable CORS in the API pipeline.
Step 1 – Enabling CORS using CorsPolicyBuilder
Add cross-origin resource sharing to the service collection using the ConfigServices() method.
Please update the ConfigureService() method as below,
public void ConfigureServices(IServiceCollection services)
        {
            services.AddCors(options => options.AddPolicy("TheCodeBuzzPolicy", builder =>
            {
                builder.AllowAnyOrigin()
                       .AllowAnyMethod()
                       .AllowAnyHeader();
            }));

            services.AddControllers();
        }
The service.AddCors() method adds cross-origin resource sharing to the service collection for the given policy defined. This method makes use of CorsPolicyBuilder to define the correct policy to be defined in the app’s container.
CorsPolicyBuilder class exposes multiple methods to help you define the rule based on headers or origin or credentials etc.
- AllowAnyHeader() – The policy allows any header.
- AllowAnyMethod() – The policy allows any method.
- AllowAnyOrigin() – The policy allows any origin.
- AllowCredentials() – Sets the policy to allow credentials.
- WithHeaders ()- Adds the specified headers to the policy.
- WithMethods() – Adds the specified methods to the policy.
- WithOrigins() – Adds the specified origins to the policy.
To protect your service from CSRF (cross-site request forgery), it’s recommended not to use methods like AllowAnyOrigin or AllowAnyHeader. Such configurations are vulnerable in nature.
So one can define the same with origin as below,
services.AddCors(options => options.AddPolicy("TheCodeBuzzPolicy", builder =>
            {
                builder.WithOrigins("https://TheCodeBuzzTest.com")
                       .AllowAnyMethod()
                       .AllowAnyHeader();
            }));
Note: The URL should not contain a Trailing slash (/)
Step 2 – Enable CORS Middleware
Update Configure() method as below for enabling the CORS Middleware
public void Configure(IApplicationBuilder app, IWebHostEnvironment env)
        {
            if (env.IsDevelopment())
            {
                app.UseDeveloperExceptionPage();
            }

            app.UseHttpsRedirection();

            app.UseRouting();

            app.UseAuthorization();

            app.UseCors("MyPolicy");

            app.UseEndpoints(endpoints =>
            {
                endpoints.MapControllers();
            });

        }
Order of Middleware Execution for CORS
Order of CORS middleware execution is important in the API pipeline. UserCors method should be called after the UseRouting() and before UseEndpoint(..) method.

The above code also ensures CORS policies are applied to all the app endpoints using CORS.
Global CORS with endpoint routing
One can use the Global CORS for all the endpoints of any Controller in API or Service. So here you define CORS globally which gets applied to all API endpoints of all Controllers exposed endpoints.
app.UseEndpoints(endpoints =>
            {  endpoints.MapControllers().RequireCors("TheCodeBuzzPolicy");

            });
CORS for Specific endpoints
One can use the enable CORS for the specific endpoints of any Controller in API or Service. So here you define CORS for one or more APIs using simple annotation techniques.
One can use the [EnableCors] attribute as an alternative to GLOBAL CORS settings. This will let you define CORS for specific endpoints using an attribute-driven approach.
Here is an example of adding a CORS policy for the POST method,
        [EnableCors("TheCodeBuzzPolicy")]
        [HttpPost]
        public void Post([FromBody] string value)
        {
        }
That’s all. This was very much the basics about CORS, what we learned today.
Learn Top 10 Best Practices for CORS
Do you have any comments or ideas or any better suggestions to share?
Please sound off your comments below.
Happy Coding !!
Happy Coding!!
References:
Summary
Today in this article we learned the basic steps required to enable cross-domain resource sharing in ASP.NET Core API. We also learned how to enable CORS in the newest .NET Core framework with a Basic understanding of CORS. We also looked at Global and Local (API-specific) CORS configurations.
Please bookmark this page and share it with your friends. Please Subscribe to the blog to receive notifications on freshly published (2025) best practices and guidelines for software design and development.
